Table of Contents
Generator Editor
The Generation Editor is the area where models are constructed at the highest conceptual level. Generators are added to represent the branches, roots, fronds, leaves, and every other component of a tree. The structure of a tree is defined by how the generators are linked. The following image shows a notional tree model and the generator hierarchy used to make it.

Adding Generators
Creating and managing the generator hierarchy is the most fundamental task of the Generation Editor. The following generators are available to use:
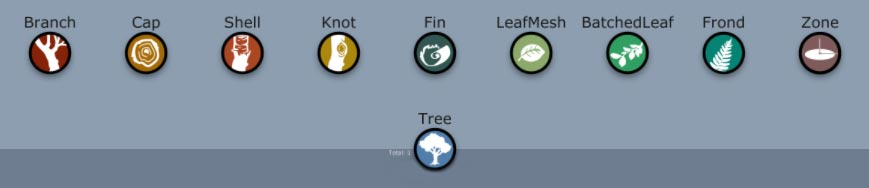
| Tree | Root of the hierarchy and houses global model properties (cannot be added, deleted, or moved). |
|---|---|
| Branch | Creates polygonal and subdivision branches. |
| Cap | Caps off the end or beginning of open branches. |
| Shell | Puts a whole or partial shell around a branch (this is a special mode of the Branch generator). |
| Knot | Adds knots, cavities, gashes, and lumps to branch geometry. |
| Fin | Adds small, planar details like fungi and peeling bark to branches. |
| LeafMesh | Creates mesh based leaf geometry. |
| BatchedLeaf | Very efficiently creates mesh-based leaf geometry (but you can't node edit the results!). |
| Frond | Places blade or mesh geometry along a branch. |
| Zone | Grow geometry from a mesh or circular region. |
Now, let's take a look at the three main ways to add a new generator:
- Click the Add icon in the Generation Editor toolbar.
- Right-click a generator and select an option from the “Add geometry to selected” menu.
- Click the Add icon in the Tree Window toolbar.
All three of these options bring up the same menu of options to add. Each entry is one of a series of templates designed to look like common vegetation components. Each template is one or more of the generators listed above, with its properties set to commonly used values. For example, when you add “Trunk” geometry a Branch generator is added with values already set to look like a typical trunk.
Note: You can use the Default Generator submenu to add a single generator of any type and modify it as you see fit.
When any of these methods are used to add a generator, the new generator is placed in one of two locations in the hierarchy:
- If nothing is selected, the new generator will be made a child of the Tree Generator.
- If a generator is selected, the new generator will be made a child of that generator.
Note: The Tree generator is always present and cannot be deleted or moved. It acts as the root of the hierarchy and houses many of the global model properties.
The fourth way to add a new generator is to copy an existing generator and then paste it. Generators placed this way will not be in the hierarchy until you explicitly link them.
Note: Any generator that cannot trace links back to the Tree generator will be ignored and will not affect the model in any way.
Select a generator and press “F2” to rename it.
Linking Generators
Generators are linked together in a hierarchy that represents the anatomical structure of the model. Each generator can have exactly one parent and each generator can have multiple children. Here are the two ways to create a link between generators:
- Add a new generator via the three main ways listed in the previous section. When you do, a link is automatically created.
- Drag a generator and drop it on another one. When you do this, any old link is deleted and the new one is created.
To delete a link, select it and press the Delete key.
Icon Overlays
Generators and links will frequently have context-sensitive hint icons applied to them. Consult the image below and the following list for a description of what the icons mean.
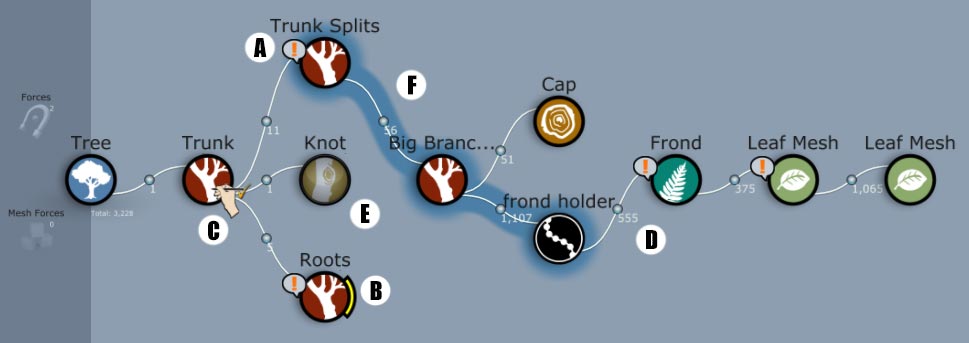
- A - Messages: Indicates that at least one error, warning, or note messages is available for this generator. Messages can be viewed by selecting the generator and opening the message pane on the Property Bar.
- B - Selection Tag: Indicates that a scene object that concerns the generator is selected (usually a force that is used on the generator or a node created by the generator).
- C - Hand Drawing: Indicates that the generator is hand drawn.
- D - Node Count: Relays the number of nodes made by the link. In this example, there are 555 frond nodes.
- E - Hidden Generator: Hidden generators are slightly grayed out.
- F - Shape Control: Generators under shape control are indicated by the blue highlight.
Note: The “Forces” and “Mesh Forces” icons near the Tree generator provide quick access to force selection and creation.
Toolbar
The Generation Editor toolbar offers three options, Add, Action and Randomize:
Add
Use this button to add generators as described above.
Actions
This button is the same as the right-click menu and changes based on whether something is selected or not.
If nothing is selected:
- Add geometry: Add generators as described above.
- Organize: Automatically arrange generators and control whether the generators are displayed in portrait or landscape mode.
- Zoom all: Zoom out to see all of the generators (double clicking empty space is a shortcut for this operation).
- Paste: Pastes and copied generators.
If a generator is selected:
- Add geometry to selected: Adds generators as described above.
- Save selected as template…: Saves any generator arrangement you make as a template and uses it later via the “From file…” option on the add menu.
- Organize: Automatically arranges generators and controls whether the generators are displayed in portrait or landscape mode.
- Zoom all: Zooms out to see all of the generators (double clicking empty space is a shortcut for this operation).
- Hand drawing: Converts procedural generators to hand-drawn generators where applicable and assigns hand drawing targets and lock states.
- Toggle visibility: Shows/Hides selected generators. Hidden generators will still compute if any of their descendants are visible.
- Clear node edits: Removes any node edits made to the nodes created by this generator. It does not affect deleted nodes (unlink and relink the generator to bring back all deleted nodes).
- Select nodes with edits: Switches to node editing mode and selects all of the nodes that have been node edited.
- Select and reveal hidden nodes: Switches to node editing mode and ensures all of the nodes are no longer hidden. Any that were hidden will now be selected.
- Randomize selected: Randomizes only the selected generators. You'll need variance on some properties for this to work!
- Variance: Quickly clears all variances or quickly sets all of their types to the same thing.
- Select: Quickly selects all generators of the same type currently selected. This is useful to make broad changes like making all of the leaves bigger.
- Cut: Copies a generator to the buffer and delete it.
- Copy: Copies a generator to the buffer.
- Paste: Pastes the contents of the buffer (new generators are created).
- Paste into: Pastes the contents of the buffer into the selected generator (no new generators created).
- Duplicate: Instantly makes a copy of the selected generator(s).
- Rename: Pops up a dialog box where you can type in a new name for the generator.
- Delete: Deletes the currently selected generators and links.
Randomize
Randomizes the whole model if no generators are selected or only the selected generators otherwise. You'll need variance on some properties for this to work!