Table of Contents
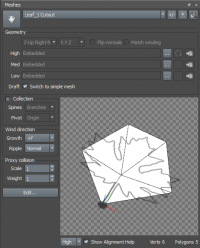
Meshes Bar
The Materials Bar is where you create a material asset that can be applied to different parts of the tree. Use it to set textures, colors/values, and other variables pertaining to the rendering.
Managing Mesh Assets
Adding, removing, changing the name, reordering, and applying mesh assets to the tree is done the same way as all of the assets. This process is described in Common Asset Settings.
Geometry
In this section, you may import mesh files for use in this asset. The SpeedTree Modeler can import OBJ and FBX meshes.
You have the option of importing different meshes for “high,” “med,” and “low.” Which mesh is used on the tree in a particular situation is controlled by your Resolution settings and LOD settings. For resolution, you also have the option of switching the mesh to a simple plane when in Draft quality.
Orientation
Changes the orientation of the mesh. The most applicable settings are “Z-up Right-handed” and “Y-up Right handed.” Set this value to the coordinate system used to create the model. For instance, a model made in Maya should be set to “Y-up Right Handed.” Arbitrary rotation orders can be applied as well.
Flip
Inverts one or more axes of the mesh.
Flip normals
The vertex normals are flipped and the mesh faces will light in the reverse direction.
Match winding
If necessary, this corrects triangles whose face normal is different from their vertex normals.
Collection
When a mesh asset has Collection enabled, it becomes a collection rather than a reference to a mesh file on disk. Parts of the tree can be set to contribute to this mesh collection, and then this mesh can subsequently be used as a Mesh force in the scene. This is a great way to, for example, grow vines around the branches of a tree.
Spines
You can choose whether branches, fronds, or both are collected into this mesh.
Pivot
This option sets the pivot point of the collection mesh. When set to “Origin,” the scene origin (0,0,0) is used as the collection's pivot. When set to “First,” the pivot of the first contributing node is used. This option is useful if the collection contributors are already growing off the tree somewhere.
Wind Direction
The properties in the Wind Direction group affect the way that leaf meshes react to wind. These settings apply only to meshes that have been assigned to leaf generators.
Growth
A vector determining the direction the mesh is “growing.” This is necessary for correct wind behavior on meshes, such as Spanish Moss, that hang down. Depending on the way the mesh was originally modeled, this value may need to be changed to match the intended growth direction prior to being imported into the Modeler.
Ripple
This value determines the ripple style used with this mesh asset.
Proxy Collision
The settings in this group apply only to mesh assets that have been assigned to a proxy generator during proxy collision detection.
Scale
This scales the bounding box of each mesh asset for proxy collision purposes. This scalar can be used to bring in or out the neighboring trees. Mesh collision scale can be further edited on a generator level (e.g. collision volumes can be scaled again per proxy generator).
Weight
Proxies are sorted by weight before proxy collision occurs, favoring the higher weight when culling. Collision weight can be further edited on a generator level (e.g. weight can be scaled again per proxy generator).
Edit
Clicking the Edit button will show the Cutout Editor dialog, where you can create or edit meshes that correspond to particular materials.
