Table of Contents
Clusters
 While low triangle counts are essential in real-time trees, maintaining visual aesthetics is also important. Instead of using individual leaf maps on many pieces of leaf geometry in a real-time tree, it is often better to use a texture that includes many leaves with their branch/twig structure to capture the same fullness with much lower triangle count. This is a “Cluster”.
Watch a video demonstrating the creation and use of Clusters, previously known as Leaf Map Makers, in real-time trees.
Note: The term “Cluster” can refer to the many-leaf texture maps or the SPM file used to create those maps.
Making a Cluster
Making a Cluster is similar to making any other tree, but you are only concerned with a single branch structure. You can start one of these from scratch, or you can isolate a branch from a previously-made tree as a starting point. You can isolate parts of the tree by hiding Generators in the Generation Editor or use Focus.
Setup View
 You will ultimately be exporting textures that will be wrapped on a piece of geometry used in another tree. It is better to model this using an orthographic, or flat, view so it will work well in this scenario.
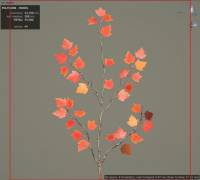
Change the viewport camera in the Tree Window from Perspective to XY plane, which will give you an above/looking down view of the isolated branch structure. You may have to move the camera and rotate the main branch around the trunk so the branch is centered in the middle of the viewport. Also make sure the base of the branch touches the bottom of the viewport, as this will be the “origin” of the Cluster in the other tree.
Leaf Lighting
Having correct normals is very important in order to have a cluster map that lights correctly. Many nuances of individual leaf lighting, such as specular highlights from different angles, can be easily lost when creating a cluster due to texture resolution and mipmap filtering. Leaves that more or less face the camera and have bold normals (where each leaf mostly lights from the same direction) tend to work better.
 Use “Local Orientation:Unification:Global” property on leaves and fronds to make them mostly face out. You can tick the “Disable two-sided rendering” option in the “Show” menu of the Tree Window to ensure they are facing the correct way. Limiting the number of deformations, such as fold and curl, you apply to the leaf can also make it stand out more and have a broader specular highlight.
The “Lighting:Unify” property can be used to minimize the variance of normals across that leaf, resulting in larger, more pronounced specular highlights. Don't be afraid to push the normals around a little bit, as well. A bit of variance on the Lighting Adjustments properties can make each leaf light slightly differently.
Collision
Too many overlapping leaves can cause a cluster to look more like a solid color from a distance. You can fix this manually by controlling the generation of the branches and leaves, but Collision is an easy way to help to alleviate it. Overlapping geometry is automatically removed.
A special form of Collision called "Cluster plane overlapping can be enabled in the Collision menu of the Tree Window. When this is enabled, any leaves that share the same camera space (not 3D space) will be tested for removal. This ensures that no leaves are overlapping specifically in the view from which you will be rendering the Cluster.
Texture Adjustments
Once the cluster is exported and brought back in as a material, it will be difficult to do texture adjustments. This is because you will be editing a map that has many things (leaves, branches, twigs, etc.) that may not all adjust in the same way.
For this reason, be sure to do all your texture adjustments before exporting. If you follow the guidelines for making good PBR Materials in the cluster file, the final material exported will also work well with PBR.
Exporting the Cluster
 Before exporting the cluster maps, enable the screenshot safe frame in the Tree Window. This will draw a red guide box in the Tree Window, indicating the exact shape of what will be exported. Set the “Width” and “Height” properties to the size you will be exporting. Then line up the tree within the shape, minimizing extra empty space.
The cluster can then be exported by choosing the option “Export Material” in the File menu. This will generate all the texture maps you will need to use this cluster in another tree.
Using a Cluster
Switch to your actual tree and import the cluster maps into a Material Asset the same way as any other material. You will most likely also want to create a Cutout mesh for it to minimize empty space while keeping the triangle count manageable.